ブログを Gatsby から Hugo に乗り換えた
【Rails】Rails 7.1 に上げたら、log/production.log にログ出力されなくなった
Rails 7.1 に上げたら、log/production.log にログ出力されなくなった
原因 🔗
どういうことだ??と思ったら、本番環境でのログ出力先のデフォルトが標準出力に変更されたみたい
Log to stdout in production by default by dhh · Pull Request #47138 · rails/rails
コンテナでの利用を想定した場合、ファイルに出力は必要ないだろうということで、デフォルトで標準出力するようにしたっぽい
アップグレード作業中の bin/rails app:update で上書きされて、目視チェックで通り抜けた模様(気をつけよう
対応 🔗
config/environments/production.rb の該当部分を元に戻して対応した
-  # Log to STDOUT by default
-  config.logger = ActiveSupport::Logger.new(STDOUT)
-    .tap  { |logger| logger.formatter = ::Logger::Formatter.new }
-    .then { |logger| ActiveSupport::TaggedLogging.new(logger) }
+  # Use default logging formatter so that PID and timestamp are not suppressed.
+  config.log_formatter = ::Logger::Formatter.new
参考 🔗
【Bundler】将来的に bundle で bundle install ができなくなる
将来的に bundle で bundle install ができなくなるらしい
というを以下のツイートで知った
`bundle install` は `bundle` にしてもよいの箇所、将来的には廃止して help を出すと変える予定なので、明示的に bundle install とうつ、の方が良いかもです。https://t.co/DHOPcll1f2 この辺
— Hiroshi SHIBATA (@hsbt) November 7, 2023
便利だったのに残念である
コミットログを見ると、v2.0で変更される予定だったっぽい
Default to printing a help message when bundle is run without argum… rubygems/rubygems@efd3a23
【Homebrew】brew upgrade で「unknown command "attestation" for "gh"」が出た時の対処法
Homebrew で入れたパッケージをアップグレードしようとして、brew upgarde をしたら以下のようなエラーが出た
unknown command "attestation" for "gh"

Usage:  gh <command> <subcommand> [flags]

Available commands:
  alias
  annotations
  api
  auth
  browse
  cache
  co
  codespace
  completion
  config
  extension
  gist
  gpg-key
  issue
  kusa
  label
  markdown-preview
  org
  pr
  project
  release
  repo
  ruleset
  run
  search
  secret
  ssh-key
  status
  variable
  workflow
解決方法 🔗
Homebrew が gh の attestation というサブコマンドを使用するようで、自分の環境に入っている gh にはこのサブコマンドが入っていないためにエラーになっていた
先に gh だけアップグレードしてあげたら解決する
【GitHub API】タグからコミットハッシュを取得する
タグに紐づくコミットハッシュを取得したいときがある
GitHub API の Get a commit で取得することができる
$ gh api repos/reviewdog/action-rubocop/commits/v2.9.0 | jq -r .sha
2c8048e3169487eccc1eed812daaa6e5275a809f
参考 🔗
Ubuntu に最新バージョンの Vim をインストールする
普通に sudo apt install vim でインストールしても、8.2 系しか入らなかった
$ sudo add-apt-repository ppa:jonathonf/vim
$ sudo apt update
$ sudo apt install vim
$ vim --version | head -n 2
VIM - Vi IMproved 9.0 (2022 Jun 28, compiled May 10 2022 08:40:37)
適用済パッチ: 1-749
参考 🔗
【M5Stack】バッテリー残量を取得する
M5Stack シリーズでバッテリー残量を取得して表示するコード
M5StickC Plus2 で動作確認した
#include <M5Unified.h>

void setup() {
  M5.begin();
  M5.Power.begin();

  M5.Lcd.setTextSize(2);
  M5.Lcd.setRotation(3);

  M5.Lcd.print("Battery: ");
  M5.Lcd.print(M5.Power.getBatteryLevel());
}

void loop() {
}
参考 🔗
【M5Stack】Wi-Fi 接続して、ローカル IP とグローバル IP を取得する
M5Stack シリーズでWi-Fi 接続して、ローカル IP とグローバル IP を取得するコード
M5StickC Plus2 で動作確認した
#include <M5Unified.h>
#include <WiFi.h>
#include <HTTPClient.h>

const char* ssid = "SSID";
const char* password = "PASSWORD";

String getGlobalIP() {
  HTTPClient http;
  String payload;

  http.begin("https://ifconfig.me/ip");

  if (http.GET() == HTTP_CODE_OK) {
    payload = http.getString();
  } else {
    payload = "Error";
  }

  http.end();

  return payload;
}

void setup() {
  M5.begin();
  M5.Lcd.setTextSize(1.5);
  M5.Lcd.setRotation(3);

  WiFi.begin(ssid, password);
  while (WiFi.status() != WL_CONNECTED) {
    delay(500);
    M5.Lcd.print('.');
  }
  M5.Lcd.println("\nWiFi connected.\n");

  M5.Lcd.print("Local IP: ");
  M5.Lcd.println(WiFi.localIP());

  M5.Lcd.print("Global IP: ");
  M5.Lcd.print(getGlobalIP());
}

void loop() {
}
参考 🔗
【Git】一つ前のコミットに変更を追加する
コミットした後に変更が漏れていることに気づいてしまった場合でも、サクッと一つ前にコミットに追加することができる
$ git add .
$ git commit --amend --no-edit
余談 🔗
今まで git commit –amend でコミットを修正していたが、コミットメッセージの編集画面が都度開くので面倒だった
–no-edit オプションを知って、都度編集画面が開かなくて済むようになったので快適になった
GitHub Actions のワークフローの実装などでの、デバッグのためのコミットしてプッシュがワンライナーで出来る
$ git add . && git commit --amend --no-edit && git push origin HEAD -f
【GitHub Actions】別のワークフローを呼び出して実行する
GitHub Actions でワークフローから別のワークフローを呼び出して実行したいケースがあった
手順 🔗
例として、Task A のワークフローから Task B のワークフローを呼び出したいとする
呼び出す側 🔗
uses で呼び出したいワークフローのパスを書く
name: Task A

on:
  push:

jobs:
  task_a:
    runs-on: ubuntu-latest
    steps:
      - run: echo Hello World!
  task_b:
    needs: task_a
    uses: ./.github/workflows/task_b.yml
ちなみにパブリックであれば、別リポジトリのワークフローでも呼び出すことができる
呼び出される側 🔗
on に workflow_call を指定する
name: Task B

on:
  workflow_call:

jobs:
  task_b:
    runs-on: ubuntu-latest
    steps:
      - run: echo Hello World!
CentOS 7 に最新版の Git をインストールする
手順 🔗
最新のバージョンは https://github.com/git/git/tags で確認できる
$ wget https://github.com/git/git/archive/refs/tags/v2.43.0.tar.gz
$ tar xzvf v2.43.0.tar.gz
$ cd git-2.43.0/
$ sudo make prefix=/usr/local all
$ sudo make prefix=/usr/local install
$ git --version
git version 2.43.0
補足 🔗
自分はまっさらな CentOS 7 だったので、以下を先にインストールした
$ sudo yum -y install wget curl-devel expat-devel gettext-devel openssl-devel zlib-devel
【Ubuntu】ログイン時に ~/.bashrc が読み込まれなくなった
問題 🔗
ログインした時に、~/.bashrc が読み込まれなくなってしまった
解決方法 🔗
自分の場合の話だが、rbenv をインストールした際に ~/.bash_profile が生成されてしまったので、中身を ~/.bashrc に移して ~/.bash_profile を削除した
原因 🔗
デフォルトでは、~/.bash_profile は存在しておらず、代わりに ~/.profile があるらしい
~/.bash_profile があると、先に読み込んで ~/.profile は読み込まれない模様
~/.profile は以下のようになっている
# ~/.profile: executed by the command interpreter for login shells.
# This file is not read by bash(1), if ~/.bash_profile or ~/.bash_login
# exists.
# see /usr/share/doc/bash/examples/startup-files for examples.
# the files are located in the bash-doc package.

# the default umask is set in /etc/profile; for setting the umask
# for ssh logins, install and configure the libpam-umask package.
#umask 022

# if running bash
if [ -n "$BASH_VERSION" ]; then
    # include .bashrc if it exists
    if [ -f "$HOME/.bashrc" ]; then
        . "$HOME/.bashrc"
    fi
fi

# set PATH so it includes user's private bin if it exists
if [ -d "$HOME/bin" ] ; then
    PATH="$HOME/bin:$PATH"
fi

# set PATH so it includes user's private bin if it exists
if [ -d "$HOME/.local/bin" ] ; then
    PATH="$HOME/.local/bin:$PATH"
fi
参考 🔗
【Vagrant】vagrant up を実行した時に出た「SSL certificate problem: self-signed certificate in certificate chain」の対応
問題 🔗
新しく開発環境を構築しようとしたら、vagrant up で起動しなかった
$ vagrant init bento/ubuntu-23.04
$ vagrant up
Bringing machine 'default' up with 'virtualbox' provider...
==> default: Box 'bento/ubuntu-23.04' could not be found. Attempting to find and install...
    default: Box Provider: virtualbox
    default: Box Version: >= 0
The box 'bento/ubuntu-23.04' could not be found or
could not be accessed in the remote catalog. If this is a private
box on HashiCorp's Vagrant Cloud, please verify you're logged in via
`vagrant login`. Also, please double-check the name. The expanded
URL and error message are shown below:

URL: ["https://vagrantcloud.com/bento/ubuntu-23.04"]
Error: SSL certificate problem: self-signed certificate in certificate chain
解決方法 🔗
config.vm.box_download_insecure = true を追記してあげたら良い
【Git】任意のメッセージを入力した状態で、コミットメッセージの編集画面を開く
以下のコマンドで任意のメッセージを入力した状態で、コミットメッセージの編集画面を開くことができる
$ git commit -em '任意のメッセージ'
よく使う -m に -e(–edit) を追加した
別コマンドの実行結果を入力した状態でコミットメッセージの編集画面を開きたい時に便利
$ git commit -em "`何かのコマンド`"
jq v1.7 で大きな数値も扱えるようになった
jq の開発体制が変わり、約5年ぶりに新しいバージョン(v1.7)がリリースされた
v1.6 では大きな値が扱えず、末尾が丸められてしまう不具合があった
(2^53(9007199254740992)までの値しか扱うことができなかった)
$ jq --version
jq-1.6

$ echo '{ "id": 872469182324827338 }' | jq .
{
  "id": 872469182324827400
}
v1.7 ではそれが解消された
$ jq --version
jq-1.7

$ echo '{ "id": 872469182324827338 }' | jq .
{
  "id": 872469182324827338
}
補足 🔗
v1.7 にアップデートする(HomeBrew の場合)
$ brew upgrade jq
Raspberry Pi 上で Gitea を起動する(Docker)
Raspberry Pi 上に Gitea を Docker で起動させた時のメモ
手順 🔗
ディレクトリの作成と移動 🔗
$ mkdir gitea
$ cd gitea
Compose ファイルを作成 🔗
version: "3"

networks:
  gitea:
    external: false

services:
  server:
    image: patrickthedev/gitea-rpi:latest
    container_name: gitea
    environment:
      - USER_UID=1000
      - USER_GID=1000
    restart: always
    networks:
      - gitea
    volumes:
      - ./gitea:/data
      - /etc/timezone:/etc/timezone:ro
      - /etc/localtime:/etc/localtime:ro
    ports:
      - "3000:3000"
      - "222:22"
ドキュメント に書いてある内容で、イメージだけ Raspberry Pi 用に変更した
起動 🔗
$ docker-compose up -d
(まだ Docker Compose V1 を使っている。。。)
アクセス 🔗
ブラウザで http://192.168.10.13:3000 にアクセス(IP は自分の環境の場合)
最初は初期設定画面が表示される
デフォルトの設定のままセットアップした
完
【GitHub Actions】create-pull-request を試す
差分があればコミットしてプルリクエストを作ってくれるアクション、create-pull-request を見つけたので試してみた
使い方 🔗
date コマンドの結果を保存した date.txt ファイルがあり、それを GitHub Actions で更新して、プルリクエストを作成するというワークフローを作るとする
リポジトリの設定で GitHub Actions でプルリクエストを作成する権限を付与する 🔗
Settings -> Actions -> General -> Workflow permissions の Allow GitHub Actions to create and approve pull requests にチェックを付けて保存する
ワークフローファイルを作成する 🔗
name: Update date.txt

on:
  workflow_dispatch:

permissions:
  contents: write
  pull-requests: write

jobs:
  create_pr:
    runs-on: ubuntu-latest
    steps:
      - uses: actions/checkout@v4
      - run: date > date.txt
      - uses: peter-evans/create-pull-request@v5
        with:
          commit-message: Update date.txt
          delete-branch: true
          title: Update date.txt
最低限の設定はこんな感じ
実行結果 🔗
 https://github.com/ytkg/create-pull-request-sample/pull/3
ちゃんとプルリクエストが作成された
更新されるか 🔗
オープンされたプルリクエストをマージする前に、ワークフローが実行された時の挙動を確認
新しくプルリクエストを作成しないで、そのプルリクエストを更新して欲しい
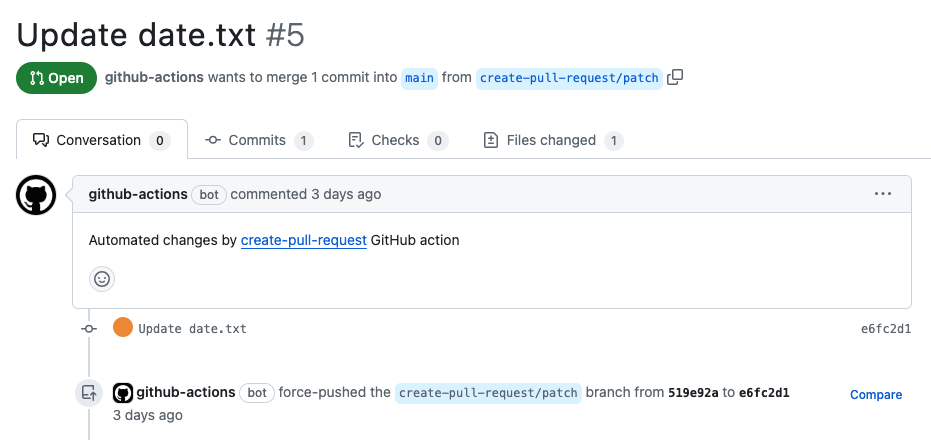 https://github.com/ytkg/create-pull-request-sample/pull/5
新しいコミットが作られ、フォースプッシュされていた
参考 🔗
GitHub Actions の job で処理を実行した後に diff が生じていたら Pull request を作成する #GitHub - Qiita
iPhone ショートカットのユーザーエージェント
iPhone のショートカットのユーザーエージェントを使って、ごにょごにょしたかったので調べた
BackgroundShortcutRunner/2038.0.0.1.2 CFNetwork/1474.3.1 Darwin/23.0.0
ちなみに Apple Watch は
BackgroundShortcutRunner/2038.0.1.10 CFNetwork/1474 Darwin/23.0.0
バージョンが微妙に違うだけ
【Bun】bun.lockb の中身を確認する
Bun のロックファイル(bun.lockb)はバイナリで出力されるので、そのままでは中身を確認するのが難しい
$ cat bun.lockb
#!/usr/bin/env bun
bun-lockfile-format-v0
\Ԭ2 q'uF87oZhonowranglerfseventsc
QG
1
=
/nanoid& zodyouch
&as-tablemustachecookiewsworkerddG' undicibusboy
capnp-tstslibdebugms
*cornesbuild.
確認する方法 🔗
bun bun.lockb で確認することができる
$ bun bun.lockb
# THIS IS AN AUTOGENERATED FILE. DO NOT EDIT THIS FILE DIRECTLY.
# yarn lockfile v1
# bun ./bun.lockb --hash: 5C898E10A3D4ACB2-b518322071ef2789-D875B246A5BDFA38-b4d881ac37988ca4


"@cloudflare/kv-asset-handler@^0.2.0":
  version "0.2.0"
  resolved "https://registry.npmjs.org/@cloudflare/kv-asset-handler/-/kv-asset-handler-0.2.0.tgz"
  integrity sha512-MVbXLbTcAotOPUj0pAMhVtJ+3/kFkwJqc5qNOleOZTv6QkZZABDMS21dSrSlVswEHwrpWC03e4fWytjqKvuE2A==
  dependencies:
    mime "^3.0.0"

"@cloudflare/[email protected]":
  version "1.20230922.0"
  resolved "https://registry.npmjs.org/@cloudflare/workerd-darwin-64/-/workerd-darwin-64-1.20230922.0.tgz"
  integrity sha512-g1hkVhLna0ICfg1l4iYOTAlfvqzZ4RD/wu5yYFaEOVwA9HlKcB9axmQxCSmeHTHfC763RqXdfBFVgBabp0SK+A==

"@cloudflare/[email protected]":
  version "1.20230922.0"
  resolved "https://registry.npmjs.org/@cloudflare/workerd-darwin-arm64/-/workerd-darwin-arm64-1.20230922.0.tgz"
  integrity sha512-FMPN7VO6tG3DWUw4XLTB3bL/UKIo0P2aghXC6BG6QxdzLqPMxXWRRfLahdFYc3uPz0ehqrZaQR5Wybck7b9Bdg==
yarn のロックファイル形式で出力される
bundle outdated の結果を Markdown のテーブル形式で出力する
bundle outdated の結果をプルリクエストに載せるために Markdown のテーブル形式にしたかった
手動でやろうと思ったら、変換してくれる Gem を見つけた

バージョン 🔗
- Ruby: 3.1.2
- Bundler: 2.3.7
インストール 🔗
Bundler 2.2 から bundle outdated の出力結果が変わってしまったので、普通のインストールでは使えない
@JunichiIto
さんがそれに対応したプルリクエストを出してくれているが、まだマージされていないので specific_install
という Gem を使って、その対応したバージョンをインストールする
$ gem install specific_install # 入っていなければ
$ gem specific_install https://github.com/JunichiIto/bundle_outdated_formatter.git support-table-stdin
$ bof -v
bundle_outdated_formatter 0.7.0
使い方 🔗
パイプで繋げてあげたらよい
$ bundle outdated | bof -f markdown
| gem | newest | installed | requested | groups |
| --- | --- | --- | --- | --- |
| factory_bot | 6.3.0 | 6.2.1 | | |
| irb | 1.8.1 | 1.6.4 | | |
| msgpack | 1.7.2 | 1.7.0 | | |
| net-smtp | 0.4.0 | 0.3.3 | | |
| rack | 3.0.8 | 2.2.8 | | |
| reline | 0.3.8 | 0.3.3 | | |
| rspec-mocks | 3.12.6 | 3.12.5 | | |
| rspec-support | 3.12.1 | 3.12.0 | | |
| rubocop-capybara | 2.19.0 | 2.18.0 | | |
| rubocop-factory_bot | 2.24.0 | 2.23.1 | | |
| rubocop-rspec | 2.24.1 | 2.24.0 | >= 0 | development, test |
超便利!
Bun v1.0 がリリース
Bun v1.0 がリリースされた
めでたい
npx や yarn dlx 相当の bunx を試してみた記録
インストール 🔗
$ curl -fsSL https://bun.sh/install | bash
# or
$ bun upgrade
$ bun -v
1.0.0
bunx cowsay を試す 🔗
$ bunx cowsay 'Hello, World!'
 _______________
< Hello, World! >
 ---------------
        \   ^__^
         \  (oo)\_______
            (__)\       )\/\
                ||----w |
                ||     ||
速い!
速度比較 🔗
npx と速度を比較してみる
npx 🔗
$ time npx cowsay 'Hello, World!'
 _______________
< Hello, World! >
 ---------------
        \   ^__^
         \  (oo)\_______
            (__)\       )\/\
                ||----w |
                ||     ||
npx cowsay 'Hello, World!'  3.26s user 0.60s system 121% cpu 3.182 total
bunx 🔗
$ time bunx cowsay 'Hello, World!'
 _______________
< Hello, World! >
 ---------------
        \   ^__^
         \  (oo)\_______
            (__)\       )\/\
                ||----w |
                ||     ||
bunx cowsay 'Hello, World!'  0.09s user 0.03s system 99% cpu 0.121 total
npx は3秒掛かっているのに対し、bunx は0.1秒
速すぎる!!
【Obsidian】Remotely Save を使って、PC とスマホで同期できるようにする(同期用サーバーは Cloudflare R2)
最近、Obsidian を使い始めた
スマホからも使いたかったから同期プラグインの Remotely Save
をインストールした
Remote Service (同期用サーバー?)に S3 が選べるので、S3 互換の Cloudflare R2 も使えるかなと思って試してみたらちゃんと使えた
手順 🔗
詳しい設定はやり方は、Remotely Save の S3 の手順で基本的にいいので省略する
Endpoint、Region、Access Key ID、Secret Access Key だけ設定したら最低限OK
- Endpoint: https://[アカウントID].r2.cloudflarestorage.com
- Region: auto
- Access Key ID: Cloudflare の R2 API トークンの管理画面から発行したやつ
- Secret Access Key: Cloudflare の R2 API トークンの管理画面から発行したやつ
API トークンの権限は「管理者読み取りと書き込み」を選んだ
内容的に「オブジェクト読み取りと書き込み」で大丈夫かなと思ったらダメだった
入力したら「Check」ボタンで確認する 「Great!」って出たらOK
スマホアプリでも同じ設定をしたら、PC とスマホで同期できるようになる
特につまずくことなくサクッと設定できた
よし、Obsidian を使いこなすぞ!
【Cloudflare Workers】Scheduled handler の開発方法
Scheduled handler の開発方法のメモ
以下コマンドで Worker を作成する
$ wrangler generate sample-worker
いろいろ対話形式で質問に答えて、Worker の種類は Scheduled handler を選ぶ
サーバーを起動する
$ yarn wrangler dev --test-scheduled
リクエストする
$ curl "http://localhost:8787/__scheduled?cron=*+*+*+*+*"
Ran scheduled event
サーバーのログに Hello World! と出力される
Hello World!
[mf:inf] GET /__scheduled 200 OK (1ms)
これで開発に着手できる
補足 🔗
どうしてこの記事を書いたか 🔗
Worker を作成すると、以下のコードが生成される
/**
 * Welcome to Cloudflare Workers! This is your first scheduled worker.
 *
 * - Run `wrangler dev --local` in your terminal to start a development server
 * - Run `curl "http://localhost:8787/cdn-cgi/mf/scheduled"` to trigger the scheduled event
 * - Go back to the console to see what your worker has logged
 * - Update the Cron trigger in wrangler.toml (see https://developers.cloudflare.com/workers/wrangler/configuration/#triggers)
 * - Run `wrangler deploy --name my-worker` to deploy your worker
 *
 * Learn more at https://developers.cloudflare.com/workers/runtime-apis/scheduled-event/
 */

export interface Env {
  // Example binding to KV. Learn more at https://developers.cloudflare.com/workers/runtime-apis/kv/
  // MY_KV_NAMESPACE: KVNamespace;
  //
  // Example binding to Durable Object. Learn more at https://developers.cloudflare.com/workers/runtime-apis/durable-objects/
  // MY_DURABLE_OBJECT: DurableObjectNamespace;
  //
  // Example binding to R2. Learn more at https://developers.cloudflare.com/workers/runtime-apis/r2/
  // MY_BUCKET: R2Bucket;
}

export default {
  async scheduled(
    controller: ScheduledController,
    env: Env,
    ctx: ExecutionContext
  ): Promise<void> {
    console.log(`Hello World!`);
  },
};
コメントに書いてあるやり方を実行してみると
【Cloudflare D1】D1 Console を触る
Cloudflare D1 の対話コンソール、D1 Console を使った時のメモ
インストール 🔗
$ yarn global add d1-console
$ d1-console -v
v1.4.5
使用方法 🔗
認証する 🔗
$ d1-console login --api-token hogehoge_token --account-id hogehoge_account_id
D1 Console v1.4.5
Successfully logged in to Cloudflare D1!
$ ls ~/.d1
credentials.json
コンソールに入る 🔗
$ d1-console
D1 Console v1.4.5
Welcome to D1 Console!
Enter a query followed by a semicolon to run it on the database. Multiple queries seperated by a semicolon will be run as a transaction (batch).
For more information, enter HELP;
D1 >
データベースの確認 🔗
D1 > SHOW DATABASES;
Databases:
╔════════════════════════════════════════════╤════════════════════════════════════════════╗
║ Name                                       │ UUID                                       ║
╟────────────────────────────────────────────┼────────────────────────────────────────────╢
║ bluesky-share-feed-db                      │ hogehoge-f7ae-40b4-9c75-f773da5eefa4       ║
╟────────────────────────────────────────────┼────────────────────────────────────────────╢
║ power-workers-db                           │ hogehoge-dfe7-4e4e-a663-78baa58d680c       ║
╟────────────────────────────────────────────┼────────────────────────────────────────────╢
║ random-blog-db                             │ hogehoge-0895-49d1-8e25-0ee96fe3ddf2       ║
╟────────────────────────────────────────────┼────────────────────────────────────────────╢
║ sample-db                                  │ hogehoge-127f-4872-80a8-bcef7b5e5d86       ║
╟────────────────────────────────────────────┼────────────────────────────────────────────╢
║ spotify-workers-db                         │ hogehoge-fef2-46f8-80fa-7d0fb588c7df       ║
╚════════════════════════════════════════════╧════════════════════════════════════════════╝
適当に触る 🔗
D1 > USE sample-db;
Switched to database sample-db
sample-db > select * from users;
╔═══════════════════════════════════╤═══════════════════════════════════╤═══════════════════════════════════╗
║ id                                │ name                              │ age                               ║
╟───────────────────────────────────┼───────────────────────────────────┼───────────────────────────────────╢
║ 1                                 │ takagi                            │ 29                                ║
╚═══════════════════════════════════╧═══════════════════════════════════╧═══════════════════════════════════╝
補足 🔗
SHOW DATABASES は show databases でも動いたけど、USE は小文字だとコンソールが落ちた
【Rails】ファイルアップロードのテストでのファイルの読み込み方法
RSpec でしか動作確認していないけど、他でも問題ないはず
ActionDispatch::Http::UploadedFile を使ってファイルを読み込んでみたが、文字列に変換されてしまった
fixture_file_upload メソッドを使うといいっぽい
fixture_file_upload('/path/to/sample.jpg', 'image/jpg'),